
With the growing popularity of Starlink’s satellite internet, many users are exploring creative ways to install their dish in locations where traditional mounting isn’t feasible. One such solution is mounting the Starlink dish on a window, which is particularly useful for renters, apartment dwellers, or those without access to a roof or open ground. In this guide, I’ll walk you through how to set up your Starlink dish on a window using the Starlink pipe adapter and a window mount, building on my previous review of the Starlink pipe adapter.
Why Mount Starlink on a Window?
Mounting your Starlink dish on a window offers several advantages:
- No drilling or permanent fixtures: Ideal for renters or those avoiding property modifications.
- Clear line of sight: Windows often provide an unobstructed view of the sky, critical for Starlink’s satellite connection.
- Ease of setup: A window mount is straightforward and doesn’t require complex tools or professional installation.
However, challenges like ensuring stability and avoiding obstructions must be addressed, which we’ll cover below.
What You’ll Need
Before starting, gather the following:
- Starlink Dish Kit: Includes the dish, cables, and router.
- Starlink Pipe Adapter: This connects the dish to a pole or mount (as discussed in my previous review).
- Window Mount: A sturdy window suction mount or clamp designed to hold a pole securely (e.g., a heavy-duty suction cup mount or a clamp-on window frame mount).
- Pole or Mast: Compatible with the pipe adapter, typically 1-1.5 inches in diameter.
- Starlink App: For checking obstructions and optimizing dish alignment.
Step-by-Step Guide to Mounting Starlink on a Window
1. Choose the Right Window
Select a window with a clear view of the sky, ideally facing north in the Northern Hemisphere (as Starlink satellites are often positioned in that direction). Use the Starlink app’s “Check for Obstructions” feature to confirm the window provides an unobstructed line of sight. Avoid windows with nearby trees, buildings, or other obstacles.
2. Assemble the Pipe Adapter and Dish
As noted in my pipe adapter for Starlink 2nd gen review, the Starlink pipe adapter securely connects the dish to a pole. Follow these steps:
- Attach the pipe adapter to the bottom of the Starlink dish as per the included instructions.
- Insert the pole or mast into the pipe adapter and tighten the screws to ensure a firm connection.

3. Set Up the Window Mount
- For Suction Cup Mounts: Clean the window thoroughly to ensure maximum suction. Attach the suction cups to the glass, ensuring they’re secure. Most heavy-duty suction mounts can support the weight of the dish and pole, but double-check the weight capacity (the Starlink dish weighs about 9.2 lbs with the pipe adapter).
- For Clamp Mounts: Secure the clamp to the window frame, ensuring it doesn’t damage the frame or compromise the window’s integrity. Tighten the clamp to hold the pole securely.
- Test the mount’s stability by gently shaking the pole. If it feels loose, reinforce the mount or consider an alternative window.
These are the ones that I bought, they both same as a package, however you could buy it separately from your local DIY stores.
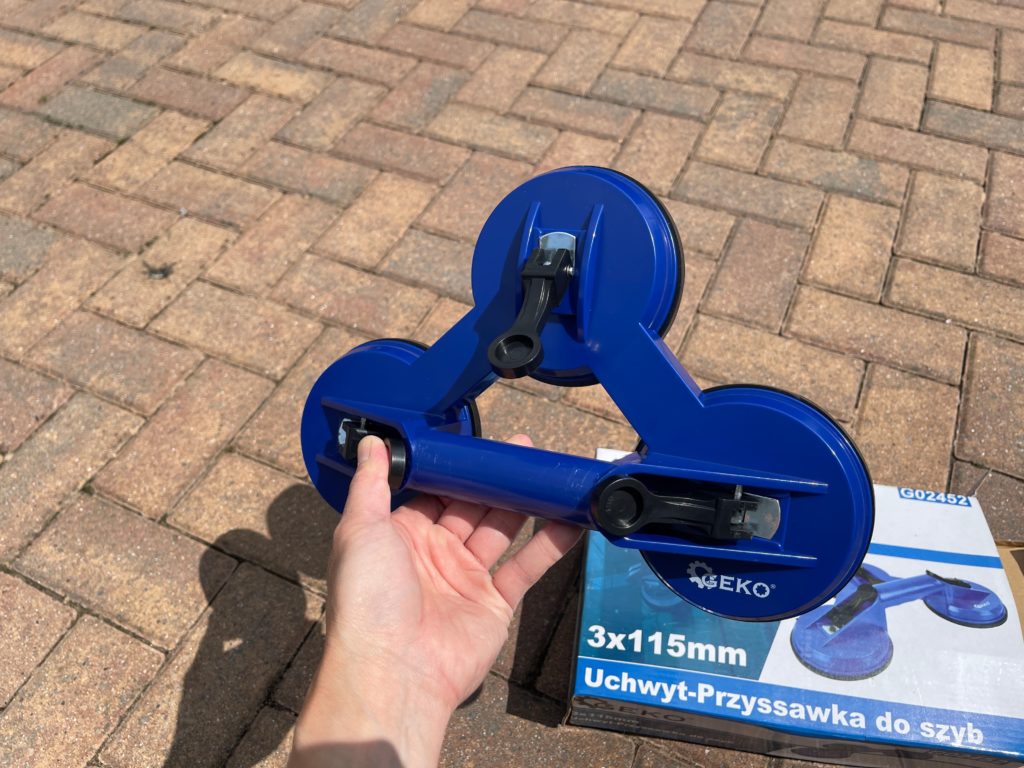
And here is the Satellite Dish Wall Mount Bracket L Arm Antenna looks like this.

4. Attach the Pole to the Window Mount
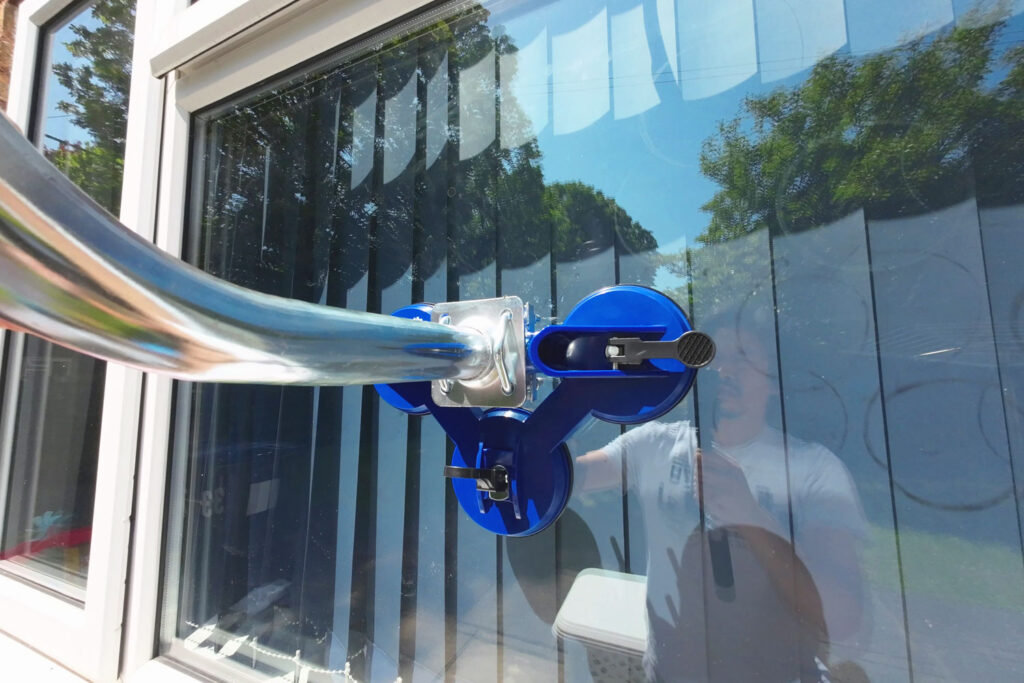
Slide the pole (with the dish and pipe adapter attached) into the window mount’s pole holder. Use a leveling tool to ensure the pole is straight, as misalignment can affect the dish’s performance. Tighten any screws or clamps on the mount to lock the pole in place.

5. Align the Dish
- Open the Starlink app and follow the alignment instructions to point the dish toward the optimal satellite position.
- Adjust the angle of the dish by loosening the pipe adapter’s screws slightly, tilting the dish, and retightening. The app will provide real-time feedback on signal strength.
- Ensure the dish has a clear view of the sky without obstructions like window frames or nearby structures.
6. Route and Secure the Cables
- Run the Starlink cable from the dish through the window. If possible, use a window with a small gap or a cable pass-through to avoid drilling.
- Secure the cable with weatherproof tape or clips to prevent it from dangling or being exposed to the elements.
- Connect the cable to the Starlink router inside your home, following the standard setup instructions.
7. Test the Connection
- Plug in the router and wait for the dish to connect to the satellites (this may take a few minutes).
- Use the Starlink app to check the connection quality and confirm there are no obstructions.
- Test your internet speed to ensure it meets your expectations (Starlink typically offers 50-200 Mbps download speeds, depending on your location and plan).
Tips for Success
- Check Stability Regularly: Window mounts can loosen over time due to weather or vibrations. Inspect the mount monthly to ensure it remains secure.
- Weatherproofing: If your window mount is exposed to rain or wind, apply weatherproof sealant around the cable entry point to prevent leaks.
- Backup Plan: If the window mount doesn’t provide a stable connection or clear line of sight, consider alternative mounting options like a balcony railing or a portable tripod (as discussed in my pipe adapter review).
- Safety First: Ensure the mount can handle the dish’s weight, especially in windy conditions, to avoid damage or injury.
Conclusion
Mounting a Starlink dish on a window is a practical solution for those who need high-speed internet without permanent installations. By using the Starlink pipe adapter and a reliable window mount, you can achieve a stable and effective setup. For more details on the pipe adapter’s performance, check out my review. With careful planning and alignment, you’ll be enjoying Starlink’s fast, reliable internet in no time!